When I began writing these posts I started by discussing the various tools of the trade, in particular word processors, one of those being Scrivener. My computer runs Windows 7 and back then I was using MS Word and was having trouble seeing the point in using any of the writing programs. I had heard great things about Scrivener, mostly from folks with Macs. I even know of one person who bought a Mac just to be able to use Scrivener. But last year around this time I tried the Windows beta and was not impressed. I tried several of the available writing programs—those applications supposedly designed for writers as opposed to general office use—and found them all to be just a lot of gadgets that were more fun to play with than a useful tool for writing a novel. In other words, they were great for people who wanted to pretend to be writers. And I concluded that to actually write all you needed was any basic word processor like Word or Open Office as all the extra bells and whistles only served to distract from the task at hand.
Last month, at the start of November, Scrivener ended its Windows beta and put out their official release. As I was starting a new book back then, and as I was playing with the idea of conducting a non-official NaNoRiMa of my own and as I knew Scrivener had a word counter, I tried it again.
I was pleasantly impressed.
A lot of changes were made from the year before, and those aspects that had made the program unusable by me, (the most glaring being the inability to resize the text on the screen independent of the print size,) were fixed. That was good news, but was it worth it? Could it really make writing easier, better?
The thing about Scrivener is that it is open-ended, meaning that it is simply a tool like a hammer, not a process like a diet plan. You can use it anyway you like. So if you want to tap a nail in with the wooden end—that’s fine, whatever suits your style. The question was, would this tool accommodate my style?
I sat down to find out.
I took time to watch the tutorials, I read how others used it, and talked to fellow writers Everyone else cited things like the ability to write out-of-order and then shift scenes around, or to being able to construct plots using the “index card” aspect of the program. I don’t do those things. I start at the beginning and write to the end, which is why Word has always worked just fine. They also spoke of how the program complies the draft at the end of the project. Again, since I write from start to finish there is no need for this—another unnecessary step. They also spoke of the lack of formatting options as if that was a good thing. In the end I was about to give up as it did not appear to suit me, but then I decided to just “play” with it and see what it could do. I spent a weekend exploring the possibilities and discovered, a bit to my surprise, it is a useful program.
Three very practical aspects of this program changed my mind.
1.Advance Chapter Breakdowns
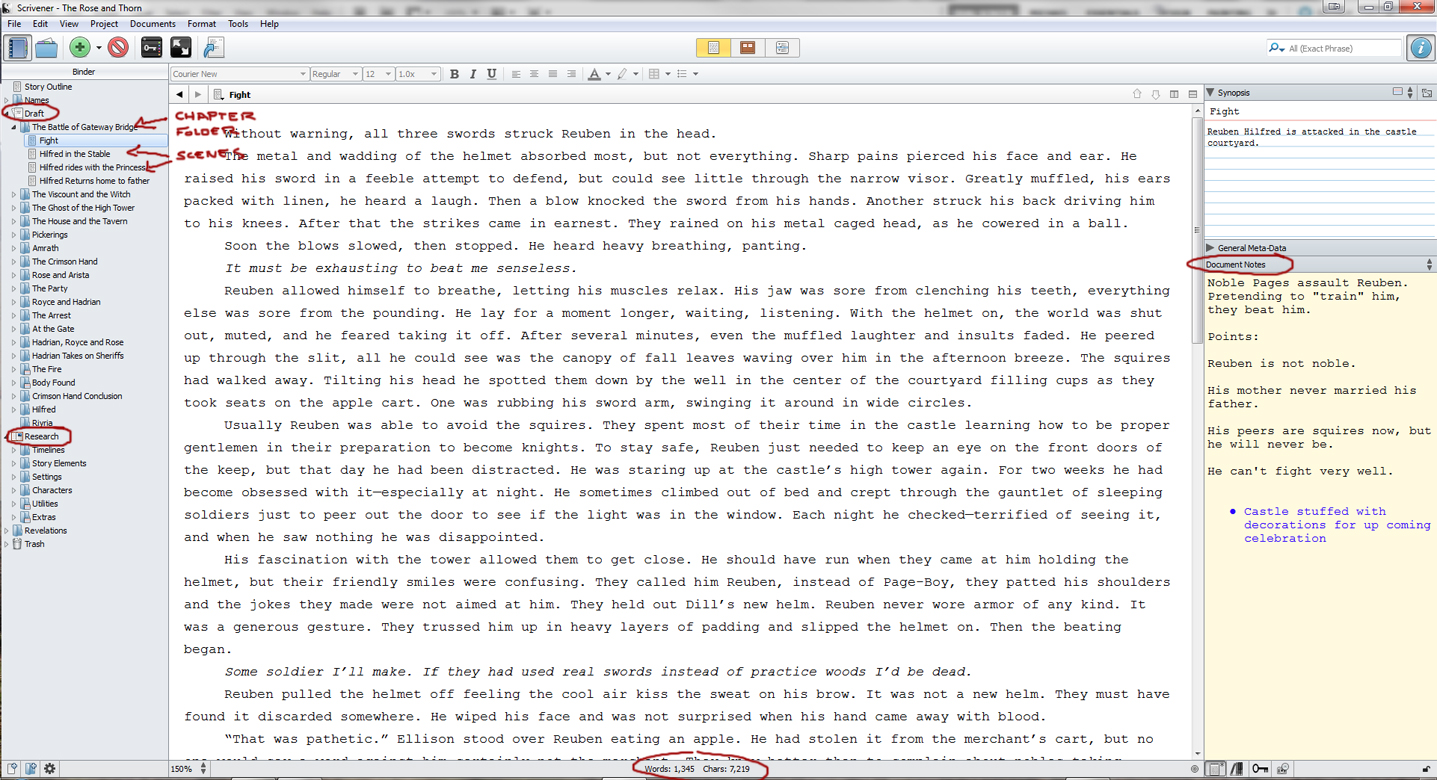
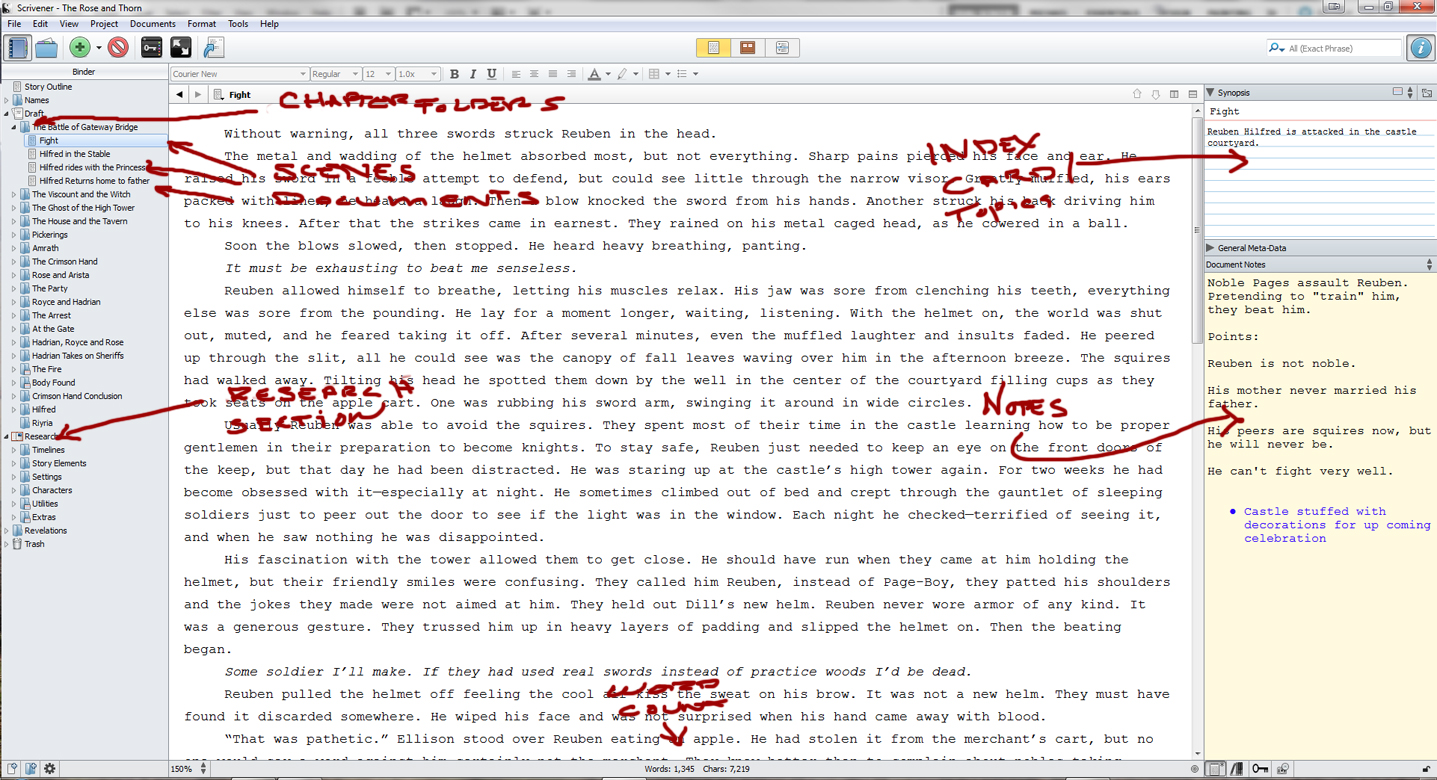
The “Binder”—the panel that appears on the left side, which works like a document index—houses folders and document trees that form the basic construction of the draft. In other words, there is a “Draft” folder, and inside that you can create folders and inside those you can create documents, in any combination you like, just as you do in your Documents Folder on your computer. The first hurdle I faced was how should I best organize my book in this program?
Friends all spoke about just writing scenes and organizing later. To me that’s just crazy talk, like saying, “just start building the house, and we’ll draw up the architectural designs later.” Instead, I very methodically began by making a folder represent a chapter, and each document inside it a scene that would be divided by scene breaks. Scrivener is actually designed to handle this nicely. I wouldn’t say “intended” as like I said the program is open enough that you can do what you like. Instead of entitling the folders Chapter 1, Chapter 2 etc. I named them like I would for the finish book. “The Battle of Gateway Bridge,” “The Ghost of High Tower,” and so on. This let me know approximately what I was going to cover in that chapter, and should I wish to change the order of the chapters I could just drag and drop in the binder tree without having to then change the numbers.
Inside the folders I created files and entitled them with short descriptions of what I planned to cover in that section. “Opening fight”, “Hiding in the Barn.” This kind of “setup” work that I was forced to do before even starting to write annoyed me a bit until I realized that in laying out the structure for the program, what I was actually doing, was outlining my book.
This idea of an interactive, practical outline was the first really—oh! moment. This intrigued me. Instead of writing out a bulleted list of events as an outline, I was making containers that did the same thing. Only I would later be able to use these folders and documents to make the book.
2. Notes

As you can see in the screen shots, on the right side is a “notes” column consisting of an index card at the top and below that a general notes window. At first I ignored these, but as I worked I saw this as a good way to replace scribbling things on pieces of paper that got lost. Soon however I realized that putting notes in each of the sections commenting what that section was about added to the idea of this interactive outline.
As I went through making my folders and section documents inside them, I put in short sentences in each section’s index cards mentioning the important points I needed to address in that section. And in the notes windows more elaborate thoughts I wanted to remember for that scene. This completed the outline just as I would have done if I were typing out a bulleted, or paragraphed list of events.
After finishing the folder-tree for the binder, I could then go back to the first document and begin writing the book. Opening that document I saw the notes I made of what I needed to write. When I finished that, I opened the next and there were the notes needed to remind me what to write there.
So instead of writing out an outline and constantly referring to it, the outline was in the book itself. I lost no time and this streamlined the writing process. I liked that.
3. Research

In addition to the “Draft” folder there is a “Research” folder. This is where Scrivener expects you to put all the info you found in preparing for your novel. Fact is I don’t do a lot of research for my fantasy books. I make all of it up. Still I felt bad looking at the Research folder thinking I should have something in there. Because it was the weekend, and because I was actively, and knowingly wasting time playing with the program, I started looking for stuff to put there.
I do have some lists that I’ve used. I have lists of names that I’ve created. Lists of medieval occupations, that sort of thing, and dropping them in here saved lots of time in finding them. I put the world map in, and made a couple of new ones for specific areas. My wife, suggested that I drop the Riyria novels in there too, so I could easily check them for references. That was just genius.
But it wasn’t enough. I found I started creating family-trees, and coats of arms. I created character timelines—their lives from birth to death, crossed indexed in an excel spread sheet against major story events, and added this to the eight thousand year history of the world I already had. I listed ranks of nobility and their appropriate address, and clan histories.

It still wasn’t enough. Then I realized what I really needed to put here were character sheets and setting descriptions. This would be a huge waste of time. I never did them before, but heh, I was supposed to be wasting time, so why not? I even went so far as to drag and drop photos from the web into the character sheets as reference. And on each page I started with the basics: when and where were they born, who were their parents, what was their childhood like…as I did this a funny thing happened. I started getting story ideas. I found that as I created these character outlines, I was going back and forth to my newly minted story outline and dropping notes into the note panels adding more things I wanted to bring up. New plot twists and new directions revealed themselves.
Wow! This really helps.
I took a whole week doing nothing more than “research” (making stuff up.) By the time I got done sketching in the major players in the story and a few of the major settings, I had the whole book laid out in fairly good detail, with lots of rich background that I could draw on.

Over the next few weeks I began writing the novel. The process was a breeze not only because I had everything right there, easy to find and easy to access, but also because so much of the work was already done. I didn’t have to stop mid-stream and think up a name for a new character. I already did that, in fact I had a whole history of the guy which I could use if I wanted, or just have as a basis for establishing his personality in my own mind. Less questions popped up as I wrote, and as a result the writing flowed with fewer roadblocks.
I was pleased enough that I will continue to use Scrivener, but more importantly, Scrivener managed to help improve my writing by showing how creating some character outlines and setting descriptions can provide fertile beds for adding in plot building and in smoothing out the writing process.
Writing a book can seem such a huge task that the initial reaction is to just start writing, as everything else feels like a waste of time, but some preparation up front can speed the process down the line and more than make up for the initial time investment.
Scrivener is $40 and they have a 30 day free trial. It is available for both Mac and Windows, although the Mac version is more advanced and has more features as it has been out longer.
And no, they aren’t paying me for this.